|
Page 2 of 6
General 
Body Quality
At a first glance the DMC-L10 looks like a classical Digital-SLR camera, but the bright 2,5’’ free-angle LCD display quickly attracts attention. The articulating screen provides some new opportunities for exceptional compositions.
Its construction leaves - like the whole body - a very solid impression. This impression is reconfirmed by the comparatively heavy weight (for a consumer DSLR) of around 530g including battery and a SD card.
It's a pitty that Panasonic follows the crowd by abandoning the design of its predecessor, the DMC-L1, in favor of a classical DSLR shape. Nevertheless the build quality of the DMC-L10 is commendable and the body is certainly a handy one. The L-10 shines thanks to tight build tolerances and good quality materials (plastics). Typical for its class it does not feature any sealing.
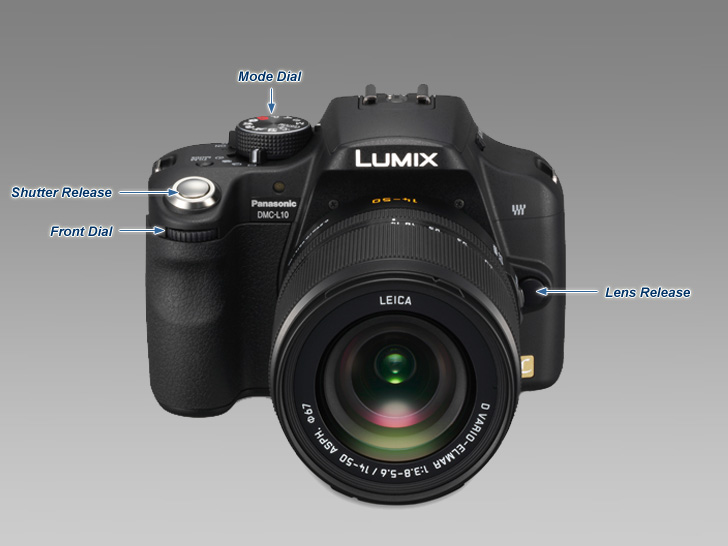
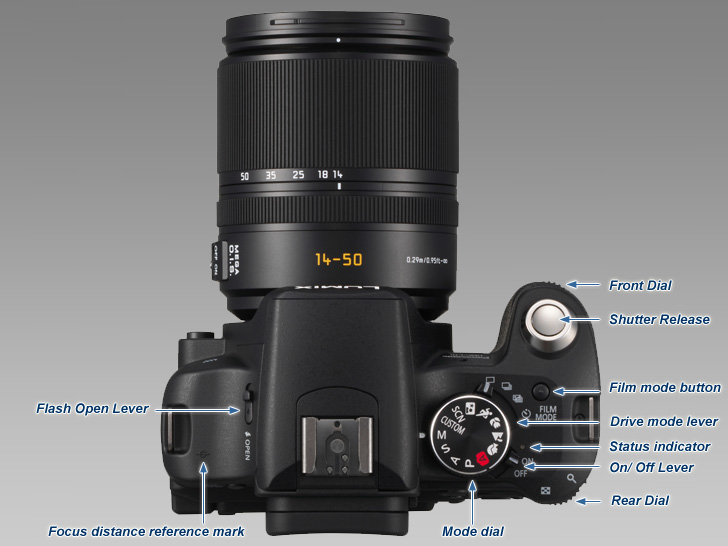
Body Handling
The Panasonic control concept is absolutely convincing. All main controls are located on the right side and can be managed with just one hand. The exposure-relevant actions like shutter speed, aperture and ISO sensitivity rely on the front or the rear dial to switch between the modes. The double dial concept with its front and rear dial is very useful as exposure compensation can be applied without pressing any button. The dials can even be customized if you prefer a different function assignment.
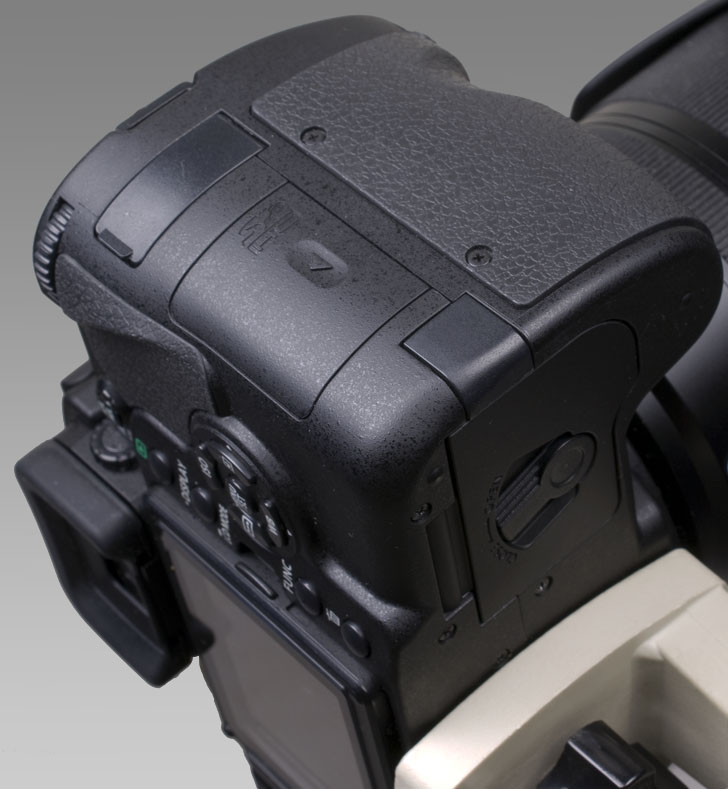
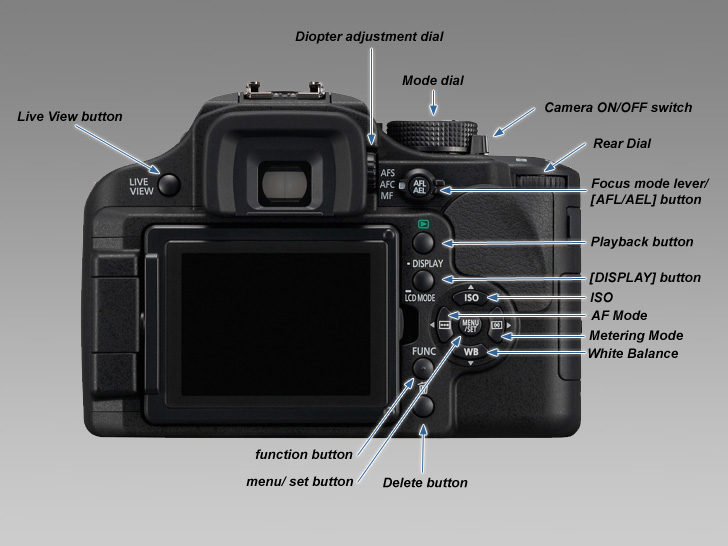
The buttons for ISO, metering mode, white balance and AF area are positioned (clockwise) around the menu confirmation button. They also serve as navigation keys when accessing the menu. The buttons can also be handled easily while looking through the viewfinder.
The ISO values can be selected in "full stops" only (100,200,400,800,1600). Panasonic also added a popular feature from the compact digital camera - Auto ISO. This is relatively new in the DSLR world. Obviously you risk ending up in high ISO land so you should probably prefer manual ISO selection.
The metering mode button positioned to the right of the menu confirmation button can be used to switch between three metering modes:
- Multiple (judging the allocation of brightness on the whole screen)
- Center weighted (center of the screen, measures the whole screen evenly)
- Spot (measures limited narrow area on the center of the screen)
Setting up the white balance manually is quite intuitive - you need to press the white balance button, choose either WB set 1 or set 2, aim the DMC-L10 at your WB target and confirm the reading by pressing the [MENU/SET]-button. The following white balance modes are available:
- AWB (Auto white balance for auto setting)
- Daylight (for recording outdoors on a bright day)
- Cloudy (for recording outdoors on a cloudy day)
- Shade (for recording outdoors in the shade on a bright day)
- Halogen (for recording under halogen lighting)
- Flash (for recording with the flash only)
- White set 1/ White set 2 (for using the preset white balance)
- Color temperature setting (for using the preset color temperature setting)
Finally we've the AF mode button with a set of AF modes:
- Face detection (detects automatically the person’s face)
- 9-area-focusing (focuses on any of 9 focus areas)
- Multi-area-focusing (focuses on any of the selected areas)
- 3-area-focusing (focuses on any of 3 focus areas points – left, right or center)
- 1-area-focusing (focuses on the subject in the AF area on the center of the screen)
- Spot-focusing (focuses on a limited narrow area in the screen)
Typical for many entry-level DSLRs the visual handling concept is centered around the display. The 2.5” LCD (207.000 pixels) powers up on demand e.g. once the shutter release button is pressed. The TFT screen has a good quality although it's a bit small by the very latest standards but its articulating design stands out for sure.
In combination with the zoom function (up to 16x magnification) the LCD is good enough to evaluate the exposure accuracy - that is unless you're working in bright sunlight. This is still a problem with today's displays but the instant histogram should help in such situations.
The menu action layout is straight forward and in line to what we're used to. The camera provides different options for image reviews including an RGB histogram and a clipping functionality.
Obviously the Panasonic Lumix DMC-L10 is able to keep up with the competition after more than one year of DSLR progress.
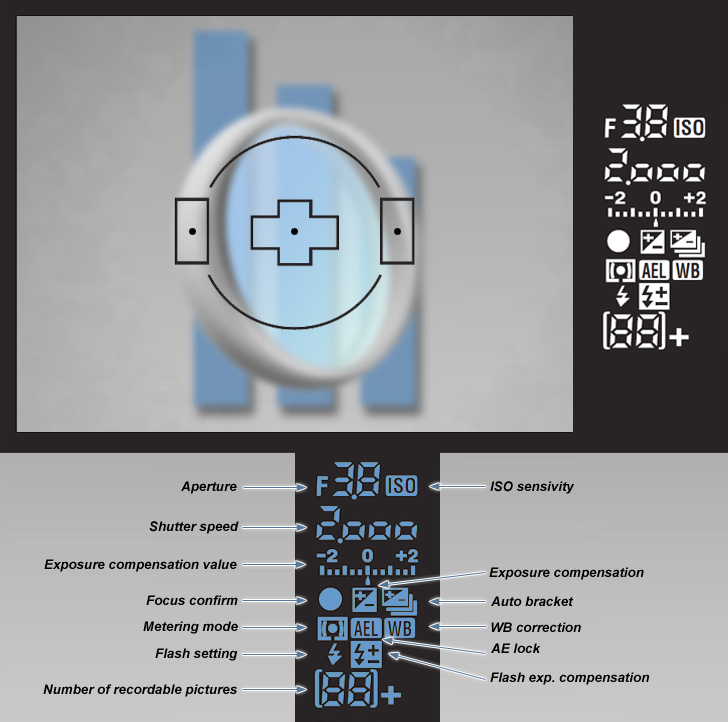
Viewfinder
The viewfinder is plain disappointing compared to upper class bodies - that's a surprise regarding the initial price point of the DMC-L10. The viewfinder has a coverage of approx. 95% and a magnification of approx. 0.92x and a dioptre correction from -3 to +1. This may sound good on paper but the figures are naturally given relative to the small 4/3 sensor size. In the real life this translates to a dark, smallish tunnel view. The amount of exposure-relevant information in the viewfinder is rather scarce showing not much more than the key exposure data - you will not find any information about the chosen white balance mode for instance. The AF sensor marks in the viewfinder are illuminated according to the confirmed focus.
Live View
As one of the first Panasonic's Live-View has reached the shores of the consumer-grade DSLRs. It provides real-time viewing of your scene via the camera's TFT display rather than the optical viewfinder. Panasonic designed the most intuitive Live View feature - after pressing the [LIVE VIEW]-button the mirror pops up, the display shows the scene with almost 100% coverage and the rest is analogous to the use of the viewfinder. Optionally you can also superimpose a grid for compositional purposes.
It is also possible to zoom in and out of your scene by pressing the [AF]-button and then the [MENU/SET]-button. The display format magnifies up to 8x. This is pretty useful for manual focusing in Live-View mode.
Focusing in LiveView is possible via so-called "Phase detection AF" and "Contrast AF". When choosing "Phase detection AF" the scene view is interrupted during the AF operation because the mirror flips down and up again in order to take advantage of the conventional AF system. In "Contrast AF" mode the camera takes advantage of a direct reading of the sensor image data for focusing but unfortunately not all lenses are supported and it's a comparatively slow implementation.
Battery
Panasonic states that the new DMW-BLA13PP battery provides sufficient energy for approximately 450 images with 50% flash usage. This value is based on CIPA standards but it seems to be a reasonable estimation based on what we've seen in the field. However when using Live-View Mode on a regular basis the battery life decreases noticeably. The supplied battery charger DE-A38F takes approx 2.5 hours for charging which is about average.
Pop-up Flash
The built-in pop-up flash unit is TTL-controlled and works fine in combination with the Leica kit lens. The guide number of approx 11 is sufficient for a fill-in flash and very basic full flash applications. 2nd curtain flash sync is also available. The maximum sync speed of 1/160s is a little bit slow but that's pretty common in this class. The flash pops up automatically when taking pictures in automatic mode. The flash output can be adjusted in 1/3EV steps up to +/- 2.
Speed
The operational speed of the Panasonic is commendable in this price range. The camera powers up virtually instantly and you'll not notice any delays during operations most of the time except in Live-View mode. The Panasonic L10 can shoot continuously up to three pictures per second when shooting in JPEG-Mode, but the number of continuous RAW images is limited to only three - this is substandard. The Panasonic can burst up to 3 images per second which is not fast enough for sports photography but surely for all other applications.
AF Performance
A 3-point AF sensor system may sound rather underwhelming but AF speed and accuracy are impressive (at least with the Leica kit lens) and that's including dark conditions. Average Joes will hardly find flaws in real-life situations. However, there are naturally limits. A 3-point system simply lacks coverage for serious sports photography. The AF tracking performance is about average but we're talking about a consumer DSLR here so that's not a real deal braker here.
Metering systems
The metering system doesn't offer anything special beyond what we are used to from a other consumer DSLRs - evaluative (multi-segment), center-weighted and spot-metering are available. The evaluative system is quite reliable but for tricky scenes you may prefer to fall back to center-weighted metering which gives you more control over the exposure process.
Dust Removal System
DSLR sensors are very prone to collecting dust so an important feature is some sort of anti-sensor-dust system. Panasonic uses Olympus proven "Supersonic Wave Filter" with ultrasonic vibrations, which shakes dust off the filter in front of the sensor. This solution is very reliable but ...
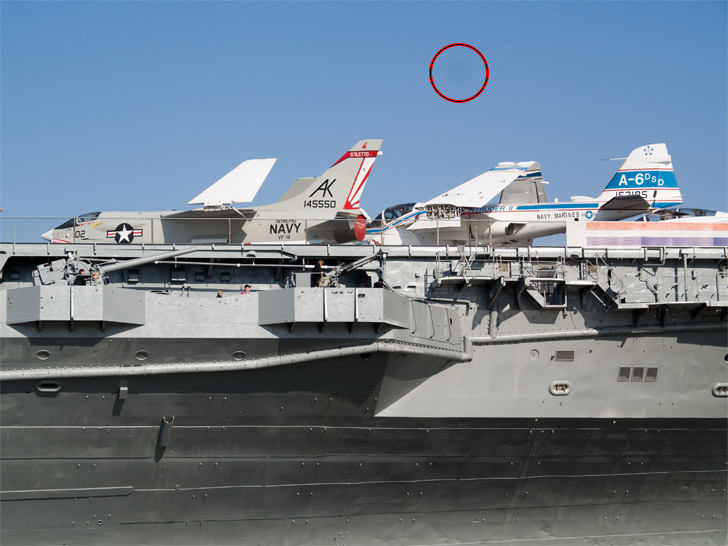
...today's dust removal systems have one strong opponent - the lens. Every time you exchange a lens dust will ultimately enter the camera and the "Supersonic Wave Filter" will care about it when it powers up. But why are we seeing dust on the upper picture - how is this possible? Dust can still enter the sensor chamber during zoom operations by sucking in air ... and dust ... and the "Supersonic Wave Filter" operates during start-up only so dust may still settle on the sensor while shooting.
|

