|
Page 2 of 3

Distortion
The Hyperprime delivers a surprisingly high amount of barrel distortion for a normal prime lens.
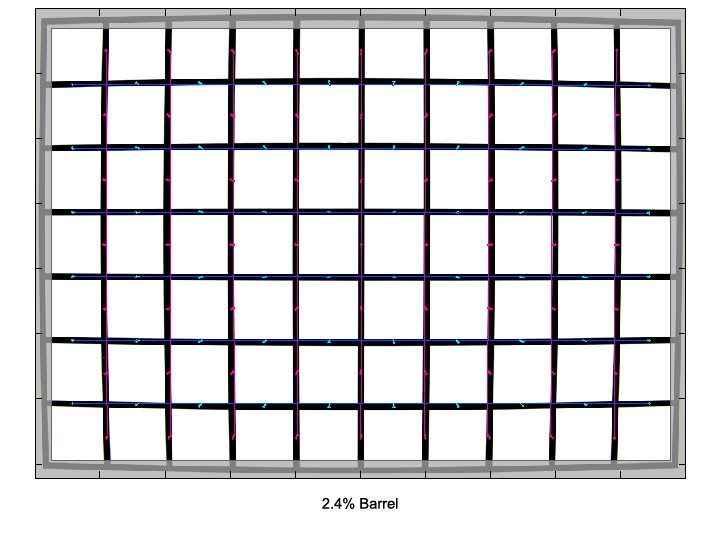
The chart above has a real-world size of about 120x80cm.
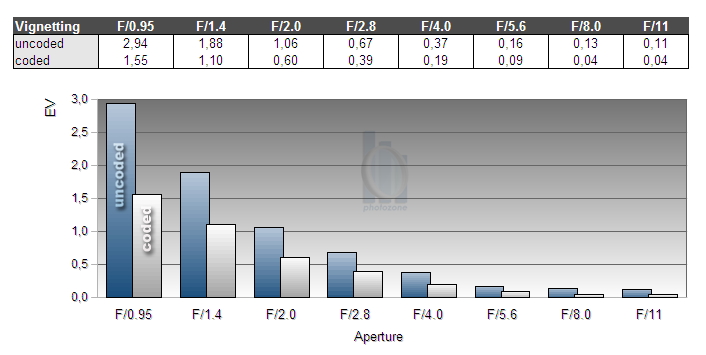
Vignetting
Vignetting is automatically corrected on digital M cameras, when the lens is either 6-bit coded or manually selected from the camera's menu. Since this correction is optional and can be switched off (by disabling lens detection), we provide both the lens' native vignetting as well as corrected figures.
The Hyperprime is not coded by default (you'll have to do this yourself if you don't want to select a value from the camera's menu each time you mount the lens). Being a 3rd party lens, it is obviously not listed in the camera's firmware and one needs to select a similar lens instead. We used the Noctilux f/1 code for the vignetting tests and also in the field.
For such a fast lens it is hardly surprising that vignetting is quite pronounced at large apertures. Wide open, light fall-off reaches a peak amount of 3 EV. As usual, stopping down considerbly reduces the issue. From f/2.8 onwards, it's no longer a problem for most subjects.
When corrected by the camera, vignetting is reduced considerably, reaching a maximum value of just 1.55 EV wide open.
Please note that this automatic correction is also applied to the raw DNG file and (regardless of whether it is done in camera or in post) doesn't come for free. Making the image borders lighter boosts the signal level as well as the noise level, thus leading to more visible noise than if there had been no vignetting.
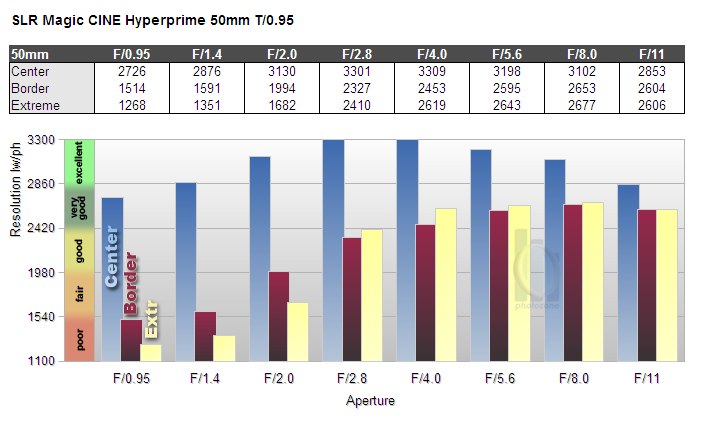
MTF (resolution)
In the image center, the lens delivers very good resolution wide open, increasing to excellent levels by stopping down.
The borders and corners start out considerably lower with poor values wide open. Stopped down to f/2, these regions begin to recover, reaching very good resolution from f/4 onwards.
The lens showed some focus shift when stopping down (residual spherical aberration).
Please note that the MTF results are not directly comparable across the different systems!
Below is a simplified summary of the formal findings. The chart shows line widths per picture height (LW/PH) which can be taken as a measure for sharpness.
If you want to know more about the MTF50 figures you may check out the corresponding Imatest Explanations
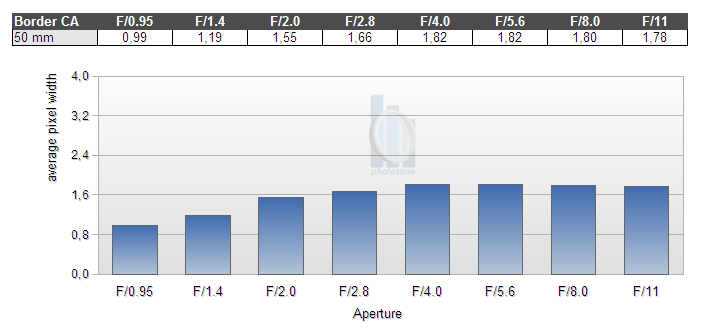
Chromatic Aberrations (CAs)
Chromatic aberrations (color shadows at harsh contrast transitions) are well under control wide open, but increase to higher values by stopping down. For most of the higher aperture range, CAs are around 1.8 pixels on average at the image borders.
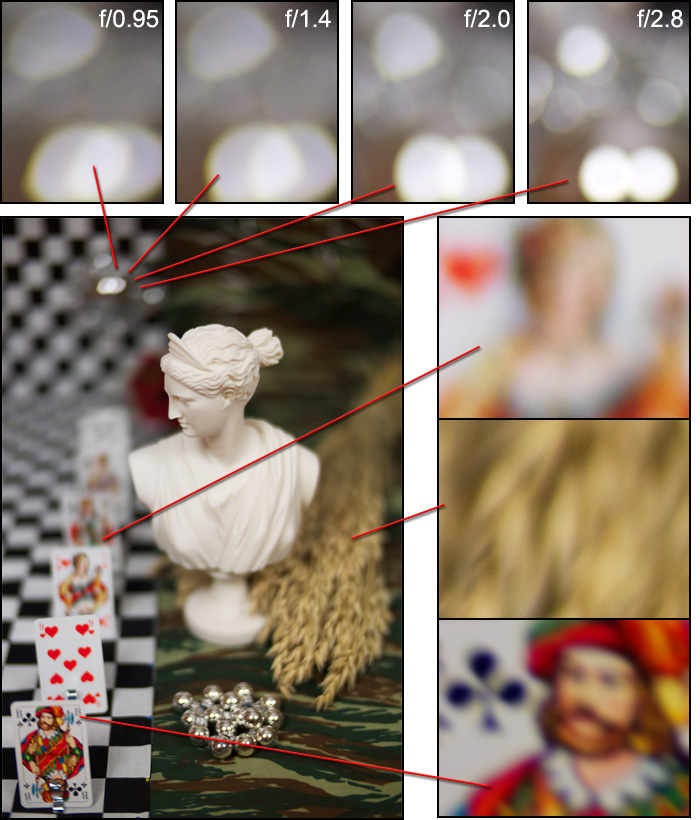
Bokeh
One of the primary usage scenarios for such a fast lens is to separate the main subject from the background. In such an image, the quality of the bokeh (out-of-focus blur) is of major importance.
The Hyperprime delivers a very smooth image blur, even in the often difficult transition zone.
Background highlights are not perfectly circular at large apertures towards the borders due to mechanical vignetting. At short focus distances, they are evenly filled and show no outlining. However, with increasing focus distance background highlights start to develop a visible level of outlining, which can be a little disturbing with some subjects.
Nonetheless, in summary the lens delivers very smooth bokeh in most situations.
Bokeh Fringing
Bokeh fringing is a common issue with fast glass. It's visible as halos of different colors in out-of-focus areas - magenta (red + blue) in front of the focus point and green beyond.
As to be expected from such a fast lens, the Hyperprime shows a fair amount of bokeh fringing at large apertures. As usual, stopping down reduces the issue considerably.
These shots also illustrate the focus shift when stopping down that was mentioned in the MTF section.
Please note that in the images below there are also rainbow colour artefacts in the ruler-like structure, right behind the plane of focus. These are moire artifacts resulting from the lack of an anti-aliasing filter in the M9, so they are not rendered by the lens, but an issue of the camera's sensor design.
|