|
Page 2 of 8
General
 The A550 is a typical representative of the DSLR species - the body shape is quite conventional except the two colour layout with a dark grey top next to the rest of the black body. It's not sealed against dust or moisture but no directly competing camera is. The whole construction feels quite sophisticated and that's including the three inch as well as vertical tilting screen. The grip plus the thumb-rest on the back are well rubberised and the size and weight are about average.
In my opinion the plastic shell - especially in combination with the second colour - gives the A550's a somewhat low-quality appearance and there is too much plastic around the body for my taste. However, there's no accounting for taste so let's have a closer look to the button layout.
Body
The button concept of the Sony DSLR-A550 follows the style of the other models in Sony's "intermediate" DSLR portfolio but as Sony has a different button layout for every of their three DSLR segments previous Sony users up- or downgrading their models might have little problems at the beginning to get along with the other concept.
However, lets have a closer look to the front of the camera.
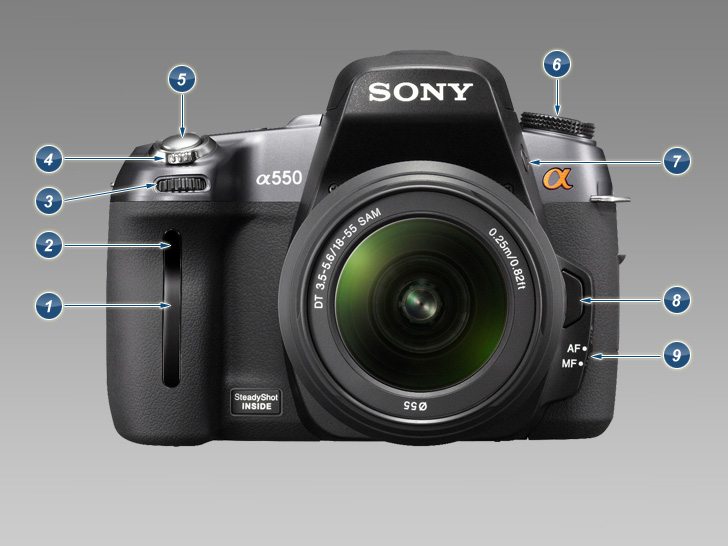
I like the way Sony put the Remote sensor (1) and the Self-timer lamp (2) into the rubberised grip of the body. Above this you can find the primary controls including the Control dial (3), the Power switch(4) as well as the Shutter button (5). The Mode dial (6) is situated on the right side where you will find also the Flash pop-up (7) and the Lens release button as well as the Focus mode switch to change between manual and auto focus mode. Nothing special here but you can see the mentioned rubberised area covering almost the whole front of the camera. Nevertheless, let's turn it around...
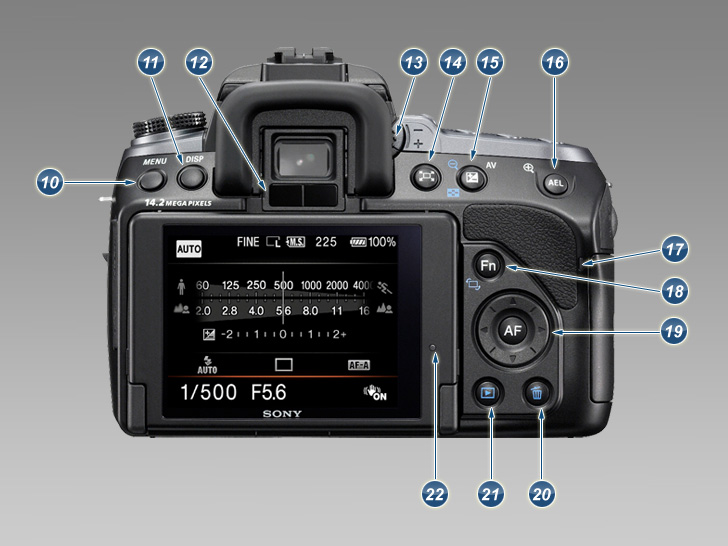
Eight more buttons on the back of the A550 including a four way controller (19) with an enter button in the middle which
can be also used for auto focusing
Starting on the left side there is the MENU button (10) to enter the setup of the camera. The menu is straight forward and divided in four sub menus for recording, custom, playback and other settings. Every sub menu includes between one and three sheets and offers customisation of basic camera settings. Friends of detailed customisation and personalization of their camera will be for sure disappointed because of the limited setting options but all other users shouldn't complain.
The Display button (11) left to the viewfinder helps to switch between the different recording information displays in viewfinder as well as live view mode and changes the information in playback mode. Below the viewfinder is the eyepiece sensor (12) which focuses the subject located in the AF area automatically when you look through the viewfinder. A nice gimmick but not really an indispensable feature in my humble opinion. Right to the viewfinder is the Diopter-adjustment dial (13) followed by the "Smart teleconverter" (14), the Exposure compensation (15) as well as AE lock button (16).
Wait - "Smart teleconverter"? Well, thanks to the stars a useful functionality like digital zoom arrived finally in DSLR land! Ohh, sorry for the irony but in my opinion it's not worth to spend a button for a gadget like this, especially when it displays nothing but an error message when shooting in raw mode and you can't assign an useful functionality like autofocus mode.
Below the three buttons you will find the flash card access lamp (17) and the function button (18) to set up easy the drive, flash and autofocus mode as well as AF area plus ISO sensitivity, Metering mode, Flash compensation, White balance, Dynamic range and last but not least Creative style. Dynamic range, Drive mode and ISO sensitivity are redundant as you can access these setting also by the corresponding button on the top of the camera.
The last two buttons on the back of the A550, just below the already mentioned four way controller (19), are the Delete (20) and the Playback (21) button. Finally, another interesting thing is the light sensor (22) on the display to automatically adjusted the brightness of the LCD monitor to the surrounding lighting conditions. This feature might be confusing as it can give you the feeling that there is a metering problem due to the automatically changing brightness and this is why I decided already after a view days to turn it off.
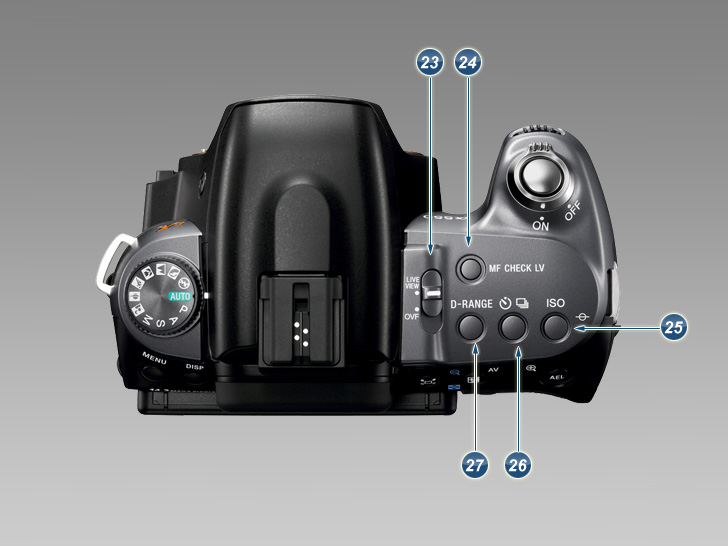
There are four more buttons and one switch on the top of the A550. The LIVE VIEW/OVF switch (23) changes between the conventional
viewfinder and Live View mode. I like the fact that the viewfinder is closed automatically when switching to live view mode as this is useful to avoid light leaks.
The first button on the top is the "Manual focus check Live View" button (24). When pressing this button during live view mode you will recognise that the image displayed on the monitor will slightly improve and this is one of the real unique selling propositions of the Sony DSLR-A550. While all other manufactures use the sensor of their DSLRs to provide live view mode, Sony implemented a second sensor in the "pentaprism housing" of the A550 in order to provide the much faster phase-AF instead of contrast-AF. This innovative solution uses the conventional AF system during live view mode without interrupting the scene view during the AF operation by flipping up and down the mirror like Canon. I will tell you a little bit more about this in the live view chapter but let me first explain the other
buttons.
The last three buttons are the already mentioned ISO sensitivity (25), Drive mode (26) and Dynamic range button (27). The latter provides besides the known Sony D-Range options an integrated HDR functionality, which I will explain in the "Dynamic Range and Tonality" section on page five.
Viewfinder
The next figure illustrates the view through the viewfinder of the A550 - at least when you are not a "four-eyes" like me because even when I press my glasses against the eyepiece I can't see the whole scene at once. This is a frequent problem in this DSLR segment but it's fairly pronounced.
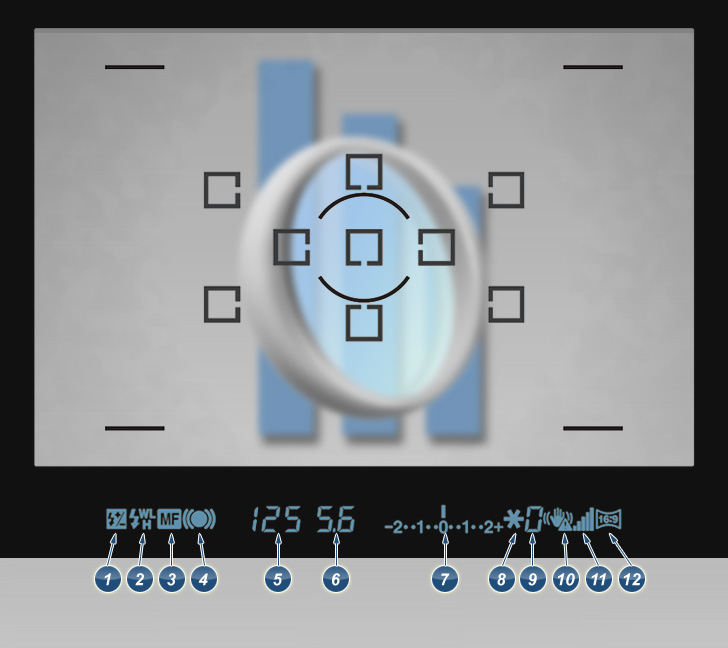
(1) Flash compensation (2) Flash charging, WL Wireless flash, High-speed sync (3) Manual focus (4) Focus
(5) Shutter speed (6) Aperture (7) EV scale (8) AE lock (9) “Shooting unavailable” warning (10) Camera shake warning
(11) SteadyShot scale (12) Aspect ratio 16:9
The viewfinder has a coverage of approx. 95% and a magnification of approx. 0.80x as well as a dioptre correction from -2,5 to +1. As you can see on the above figure the amount of exposure-relevant information in the viewfinder is rather scarce, showing not much more than the key exposure data. You will not find any information about the ISO, the chosen metering nor the white balance mode for instance.
It's not possible to super-impose grid lines for accurate scene compositions like with the Nikon D5000 and even worse than that is the fact that the AF boxes disappear after successful focusing. This means you don't have any reference lines to align for example the horizon within your images while shooting. In my opinion this is more a bug than a feature and the only workaround for this issue is to shot in self-timer mode as the AF boxes don't disappear than and this gives you the needed time to arrange your scene accurately.
Nevertheless, regarding the size and brightness the viewfinder of the A550 in on par with the Canon EOS 500D but both are unfortunately below the viewfinder of the Nikon D5000. In practical terms the viewfinder appears to be small and a bit tunnel-like.
Live View
As already mentioned above the Sony A550 has an exclusive image sensor for Live View. The second sensor works generally like the main sensor except the fact that it lies in front of the mirror in the "pentaprism housing". This has two big advantages; on the one hand you can use the much faster conventional phase-AF of the camera and on the other hand the image quality improves because of reducing the risk of noise due to sensor heating. Unfortunately, the second sensor has only a coverage of 90% while even the conventional viewfinder has 95%. However, if you need the whole coverage you can switch to "MF Check LV"-Mode and use the main sensor but only manual focusing is available than. Live-View obtained from the secondary sensor is also not as accurate regarding focusing actions compared to a main sensor approach.
Additionally, Sony's Live View comes with some gimmicks like the already mentioned "Smart Tele Converter" and a face detection with "smile shutter".
In combination with Sony's high resolution Xtra Fine LCD the A550 shows an intuitive and one of the fastest Live View implementations so far. Solely the limited "two way" tilting screen is a drawback because it is useless for upright shooting
Battery
Sony states that the NP-FM500H battery provides based on CIPA standards sufficient energy for approximately 950 images with viewfinder
and 480 images in live view mode. These are impressive values and it is a reasonable estimation based on what I've seen in the field
and this means the Sony A550 beats the stamina of the Canon EOS 500D and the Nikon D5000 almost by double.
Additionally it's worth mentioning that Sony's NP-FM500H battery is compatible with almost the whole DSLR portfolio. This is pretty good
for the environment and I wish other manufactures would follow Sony's lead.
Potential Risk of Smart-Lithium Batteries - a short story.
It was on a track down in Australia when I changed the lens on my Sony A550 with a fully charged NP-FM500H battery. The camera didn't turn on! No error message - NOTHING! Three days later I went back from the track and put the NP-FM500H battery for just one second in the charger and tried again to turn my camera on - it worked.
Well, what happend? The lens, the Sony 70-300mm f/4.5-5.6 SSM G had an invisible defect and I guess it caused a short-circuit which set
a parameter within the NP-FM500H battery not to turn the camera on. After one second in the charger the parameter was reset and it worked again. I couldn't reproduce this error in the beginning as I was able to change the lens every now and than without any problems and this is why I ran several times into this situation. All I want to say is, that it might be a good idea to keep batteries "stupid" and not to implement to much functionality to avoid such situations.
Pop-up Flash
The built-in pop-up flash unit with a sufficient guide number of approx GN12 at ISO100 is TTL-controlled and has a flash coverage of up to 18mm focal length (35mm equivalent: 27mm) so it's matched with the Sony 18-55mm F3.5-5.6 SAM "kit" zoom lens. It supports
autoflash, fill-flash as well as rear-flash sync with a maximum sync speed of 1/160s and high speed sync with a optional compatible accessory flash. Furthermore, the flash output can be adjusted in 1/3 steps up to +/-2EV and the flash pops up automatically when taking pictures in automatic mode.
Speed
The operational speed of the A550 is extremely fast. The camera powers up virtually instantly and you won't notice any delays during operations in standard image mode and as already mentioned even Live View mode is one of the fastest implementation I have seen so far.
The camera stores images pretty fast to SD memory cards. Sony states a burst processing rate of four images per second in Live View as well as five images per second in viewfinder and up to 7 frames in speed-priority continuous mode, where the exposure and focus are set at the first shot. This is really fast and there is no other camera in this segment with such a huge number of frames per second - another unique selling proposition of the Sony DSLR-A550. However, the number of continuous shots at this speed is limited to 32 Fine JPEGs or 14 RAW images. Nevertheless, regarding the frame rate the A550 is fast enough for professional sports photography but how about the AF Performance...
AF Performance
The Sony A550 comes with a TTL phase-detection system including 9 points with centre cross sensor and the standard AF modes continuous, single shot, automatic and manual focus. All in all, the AF speed and the accuracy of the Sony A550 are very good even in dark conditions as well as in continuous AF mode and on par with the Canon EOS 500D and the Nikon D5000. However, regarding the AF performance in Live View mode, the Sony A550 is unbeatable in comparison to other Live View implementations to date and a real unique selling proposition.
Metering systems
The metering systems doesn't offer anything special beyond what we are used to from other consumer DSLRs. Multi segment, center weighted as well as spot metering are available. The Multi segment system is pretty reliable but for tricky scenes you may prefer to fall back to partial metering which gives you more control over the exposure process.
White Balance
The camera does a good job in natural lighting conditions but it does still struggle in artificial light conditions where you should either prefer to fall back to a flash unit (thus neutral light) or manual WB.
Dust Removal System
The Sony A550 comes with an anti-static coating and a CCD shift mechanism to prevent dust and debris on the sensor. Unfortunately,
this CCD shift mechanism is primarily a build-in image stabilizer and not an integrated sensor cleaning unit. During outdoor activities I had to clean the sensor almost every day. Unluckily Sony's dust removal unit is still one of the unreliable anti-dust
systems out there and you shouldn't go without one of the external cleaning solutions like e.g. the Arctic Butterfly.
|

