|
Page 2 of 3

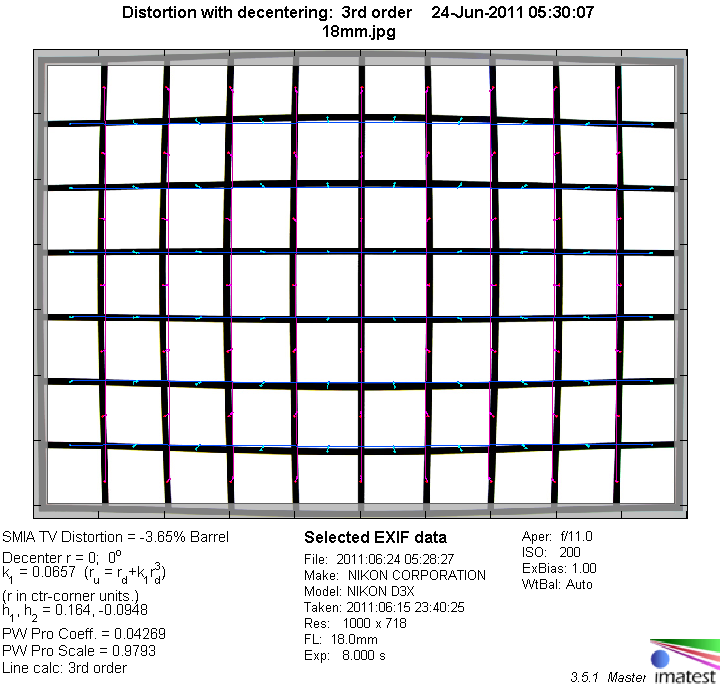
Distortion
The lens shows a significant amount of barrel distortion with a moustache sub-style at the short end. Zooming in, the distortion becomes more uniform, but remains on a rather high level at 21mm. At longer focal lengths, the total amount decreases further, but even at the long end of the zoom range there is still some amount of barrel distortion that can be disturbing in images with critical subjects.
|
Move the mouse cursor over the focal length text marks below to observe the respective distortion
|
| 18mm |
21mm |
28mm |
35mm |
|
|
The chart above has a real-world size of about 120x80cm.
The huge amount of barrel/moustache distortion can be really annoying with subjects that contain straight lines, especially since it is harder to correct in post processing than uniform distortion. The image below illustrates the issue with a real-world subject instead of a chart.

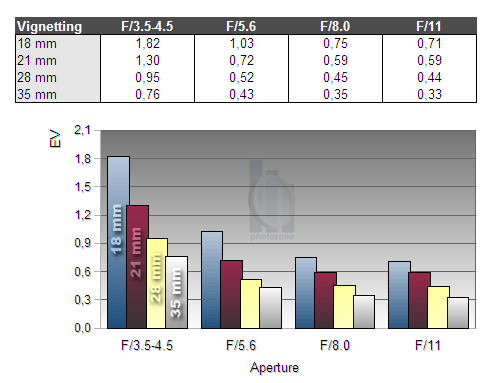
Vignetting
The lens produces significant light falloff towards the corner at its widest setting, especially wide open. As usual stopping down helps to considerably reduce vignetting. The amount of vignetting wide open constantly decreases towards longer focal lengths, but for critical subjects it's still a good idea to stop down a bit to further reduce the issue.
We're performing our vignetting analysis based on
(uncorrected) JPEGs straight from the camera. The JPG engine of the Nikon D3x features a rather flat
gradation curve, thus has a moderate contrast characteristic, resulting in comparatively low vignetting figures - the
corresponding Canon figures are roughly 40% higher due to the more
aggressive default contrast setting.
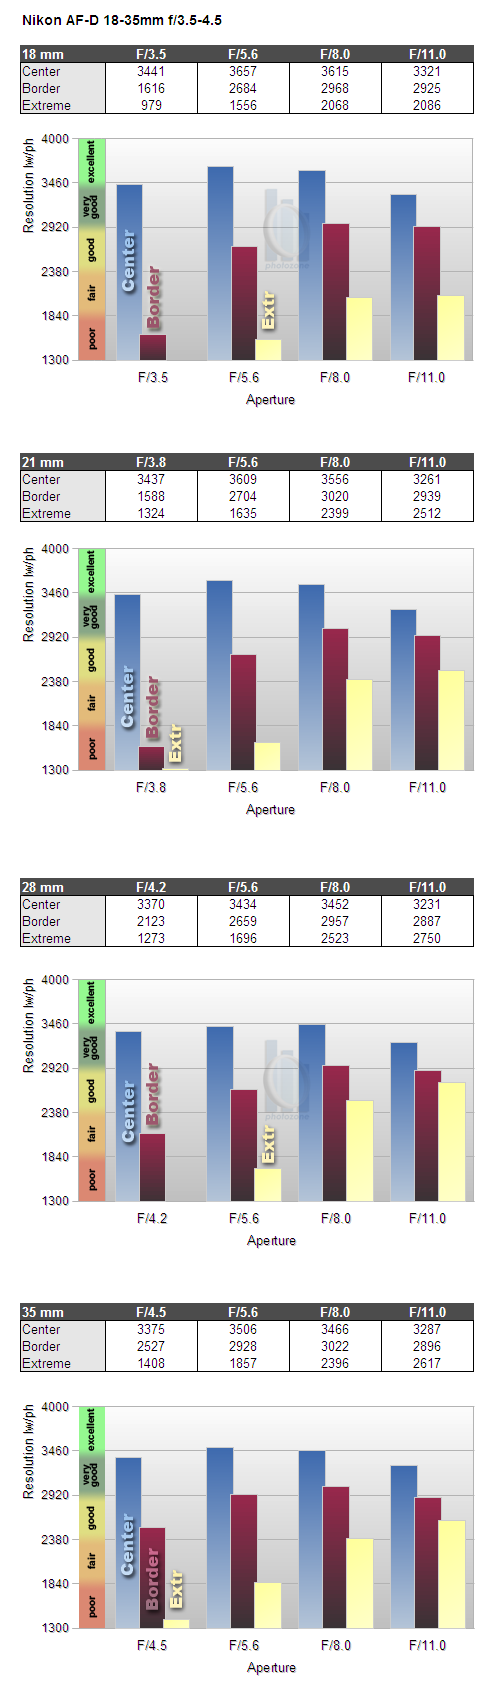
MTF (resolution)
This section has been updated since the review was published. We initially based our findings on a sample of the lens that unfortunately turned out to be out of specs. The findings below are based on a second sample that was reviewed later. Please see this thread in our forum for additional details.
Let's start with the good news: the center resolution is very good to excellent at most focal lengths and drops only slightly when zooming in.
The borders and corners, however fail to impress - to put it mildly. The borders are very poor wide open at short focal lengths, but improve to good resolution towards the long end of the zoom range. By stopping down to f/8 or even f/11 the resolution can recover and reach "good" to (just) "very good" sharpness.
The extreme corners are even worse. At large apertures they are so soft that for some focal lengths they dropped off our scale. It is possible to reach good sharpness in the corners by stopping down to f/11, at least at medium and long focal length settings. At the short end of the zoom range, however, sharpness doesn't get better than "fair" here.
There is also some amount of field curvature, especially at the short end of the focal range. However that's not the reason for the poor corner performance in the charts below, our measurement approach takes field curvature into account already.
Please note that the MTF results are not directly comparable across the different systems!
Below is a simplified summary of the formal findings. The chart shows line widths
per picture height (LW/PH) which can be taken as a measure for sharpness.
If you want to know more about the MTF50 figures you may check out the corresponding
Imatest Explanations
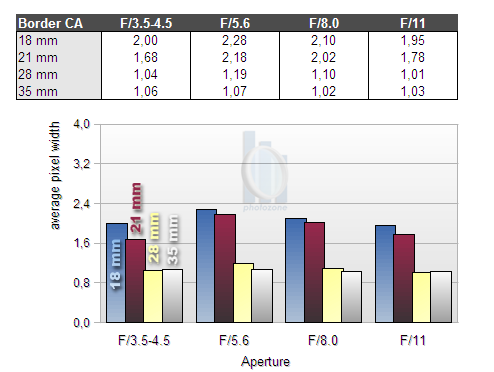
Chromatic Aberrations (CAs)
The level of lateral CAs (color shadows at harsh contrast transitions) is on the high side towards the short end of the zoom range, reaching peak values of more than 2 pixels. At 28 and 35 mm the amount of CAs is significantly lower.
However, CAs can easily be corrected in software or by the camera itself (most modern Nikon DSLRs remove CAs themselves if you shoot JPGs).
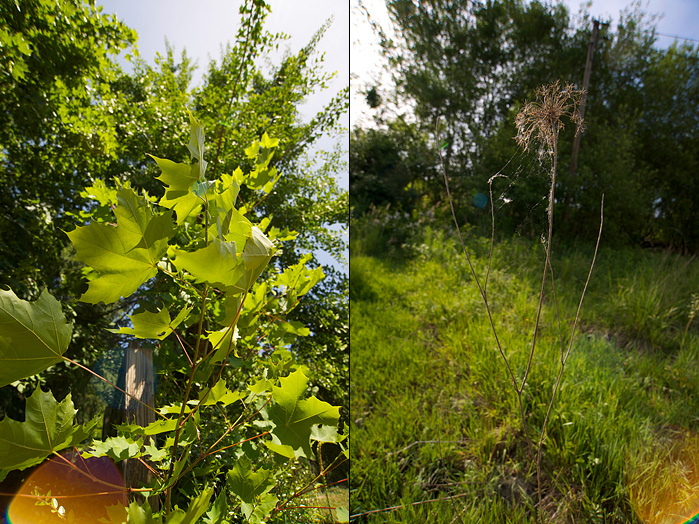
Flare
The lens handles backlight quite well for a wide angle lens. However, there is one exception. If the sun (or a similar strong light source) is roughly in line with a diagonal through the images corners, but just out of the frame, a nasty and quite huge orange spot appears in the opposite corner. That huge spot is accompanied by a less visible blue circle half way from the image center, as can be seen in the two sample images below.
However, don't blow this out of proportion, as explained it takes certain requirements for these flare spots to appear. Moving just a little bit is usually all it needs to get rid of them.
|

