|
Adobe Camera RAW (ACR) 4.1 |
|
Imaging -
Imaging
|
Introduction
As of the time of this review Adobe Camera RAW 4.1 is the current RAW image converter
of Photoshop CS3/Bridge CS3. The plug-in is not compatible to older Photoshop versions -
a typical although unfortunate product strategy by Adobe. The principal usage concept
remains the same like in older ACR version although Adobe beefed up the feature list
and they also changed the demosaicing and sharpening algorithm (compared to v4.0 and
older versions).
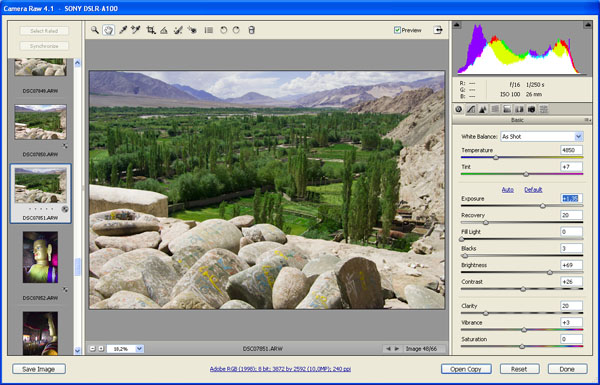
Here's a how the development user interface looks like ... (click on the image for an enlargement):

Workflow Concept
As a file import plug-in ACR is based on the underlying Photoshop infrastructure so it
doesn't come with an own file handling. If you want to process a number
of RAW files you have to drag'n drop those files into the Photoshop application which will
then hand them over to ACR. Alternatively ACR can also be used within Adobe Bridge CS3
which features image organization functionalities like image rating, filtering, etc. pp.
As you can see in the sample image above ACR displays thumbnails of your RAW files to the
left side. The images can be rated within ACR but not filtered according to the rating.
The currently active RAW file is displayed in the center whereas all (tab-grouped) RAW-processing
controls are located to the right side. Due to the vast number of tuning option things are a bit
cramped and you've to get used to the tab selectors functions (via tiny icons). You can apply
changes to the RAW files in any order - ACR will store those in small .xmp files
(one per RAW file) or a dedicated database.
Once you're done you can either choose to open the selected results in Photoshop (usually not a
good idea regarding the memory size of today's RAW files) or export them to storage. The process
also works concurrently if your computer has the sufficient processing power - you can work on a set
of new RAW files whereas ACR is exporting finished files in the background. If you want to
improve your work you can also do so in another session based on your latest changes (stored
in the .xmp files or the DB). Preferred settings can also be saved in "presets" for future re-use.
Processing Controls
| CONTROL |
IMPLEMENTED |
| Basic Exposure | Yes |
| Auto Exposure | Yes |
| Highlight/Shadow | Yes |
| Tone Curve | Yes |
| Lateral Chromatic Aberration (CA) | Yes |
| Purple Fringing (PF) | Yes (doesn't work well) |
| Vignetting | Yes |
| Auto Lens Flaw Correction | No |
| Distortions / Perspective | No / No - available via the "Lens Correction" filter within Photoshop CS3 |
| Rotate / Crop | Yes / Yes |
| Noise Reduction | Yes |
| Sharpening | Yes |
| White Balancing | Yes |
| Color Saturation | Yes (per base color) |
| Color Vibrance | Yes |
| Hot Pixel Detection/Masking | Yes |
| Photo Organization | No - available via Adobe Bridge CS3 |
| Import Formats | most RAWs |
| Export Formats | JPEG, TIFF, DNG, PSD |
Conversion Results
As mentioned Adobe changed both the demosaicing and sharpening algorithms in ACR v4.1.
By default the results are somewhat softer although a bit less noisy compared to pre-4.1
versions. If you prefer more snappy results you can achieve an "old style" sharpness
by tuning the sharpening options. Besides the common unsharp masking ACR 4.1 has now a
"detail" slider - probably a technologies that made it from RawShooter (taken over by
Adobe in 2006) into ACR. It isn't quite as aggressive as the old RawShooter variant but
it does make a difference (without obvious sharpening halos) - it sharpen
structures rather than edges.
Another new feature is "clarity" - it seems to be a some sort of "macro sharpening" similar
to unsharp masking with a very coarse sharpening radius. This works very well if you
want to increase a faded edge contrast like a distant horizon vs the sky.
The build-in luminance noise reduction requires a rather aggressive approach at cost of some
softness so it should used with care - the chroma (color) noise reduction is very efficient
though. The processing speed of the noise reduction is very high.
Lateral CAs can be removed perfectly (unless you've an out-of-spec lens of course), same goes for
vignetting. It is an all-manual process though.
ACR 4.1 offers a new anti-purple fringing option but, frankly, it doesn't seem to do
the job.
There's still no way to correct distortions which is unfortunate because you have
to rely on secondary applications if these flaws matter to you.
Compared to pre-v4 version there're now new controls for color vibrance and especially
highlight/shadow handling. Apart from exposure related functions you can also influence
color saturation and hue here - Adobe refers to this as "Split Toning".
The quality of the (optional) auto-correction has also been improved a bit without being
perfect (naturally) - most of the time you will probably still prefer manual fine tuning.
Conclusion
Adobe Camera RAW v4.1 is a quite significant evolutionary step up from v3.6. It takes
advantage of the same basic concepts and adds new controls for (structural) details,
clarity (macro sharpening), a simplified handling for highlight/shadow control,
color vibrance and a more detailed approach to color saturation and hue. ACR is "only"
a plug-in but it is reasonably well integrated into Adobe Bridge CS3 (which takes care
of the image organization aspects) and Photoshop CS3 (for further corrections). If you
prefer a more harmonic combination you can get the same ACR feature set in Lightroom
v1.1. All-in-all it is the tool to beat but it is not perfect - there're
still no correction controls for distortions/perspective and the anti-purple-fringing
isn't overly efficient.
|