Introduction
SilkyPix is one of the older players in the market. Initially only available to Japanese
users (or at least to those capable to read the Japanese language controls) they opened
up the product by popular demand to a broader audience with an english version fairly
recently - some desperate users even hand-patched the earlier Japanese version to
English because of the color quality of converted images. The application is very
frequently updated with either new features, and there're already loads of them, or
new RAW formats. Interestingly the product is also shipped with the high-end digicams
and DSLRs from Panasonic now. The pricing of the public product is quite moderate.
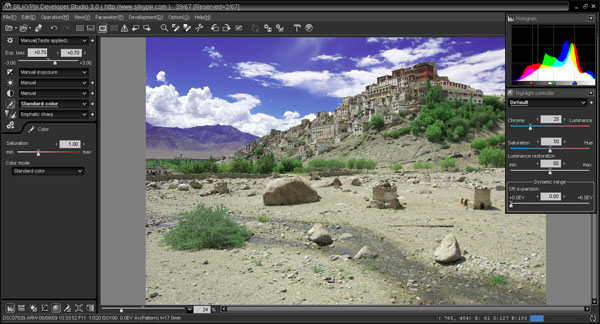
Here's how the development user interface looks like ... (click on the image for an enlargement):

Workflow Concept
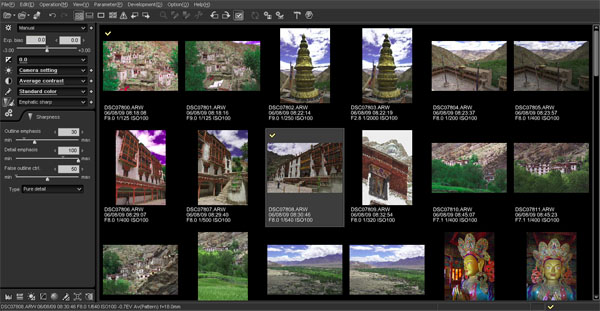
SilkyPix offers you to handle single images or a whole directory. In the latter case
it offers you the usual thumbnail overview which also shows the shooting data for the
individual images. Images can be marked for batch conversion and also flagged with
colors for additional organizational purposes. A double click on a thumbnail will
enlarge the selected image. However, all modification can already be performed on the
thumbnails so there's no formal development mode within SilkyPix. The primary correction
options are located on the left side (unless otherwise configured) - selecting one
of these options unfolds the corresponding controls. Several more correction options
are available via icons at the bottom. Selecting one of these will pop up more windows
with extensive correction controls. Most controls are slider-based. SilkyPix offers
a range of prepared settings for most controls but you can add your own profiles to these
lists to speed up your own workflow.
Similar to most other applications SilkyPix stores all modification information in an
additional dedicated file per images (within a sub-folder) so there's no need to finalize
your work at once.

RAW Processing Controls
| Control |
Implemented |
| Basic Exposure | Yes |
| Auto Exposure | Yes |
| Highlight/Shadow | Yes |
| Tone Curve | Yes |
| Lateral Chromatic Aberration (CA) | Yes |
| Purple Fringing (PF) | No |
| Vignetting | Yes |
| Distortions / Perspective | Yes (manual) / Yes |
| Rotate / Crop | Yes / Yes |
| Auto Lens Flaw Correction | No |
| Noise Reduction | Yes (basic) |
| Sharpening | Yes (2 styles plus USM) |
| White Balancing | Yes |
| Color Saturation | Yes (per base color) |
| Color Vibrancy | No |
| Hot Pixel Detection/Masking | No? |
| Photo Organization | Yes (basic, related to batch processing only) |
| Import Formats | almost all RAWs, TIFF, JPEG |
| Export Formats | JPEG, TIFF |
Conversion Results
A verdict for the conversion quality with SilkyPix isn't easy. You have to work quite
a while with the application to explore all the possible tuning options.
Out-of-the-box SilkyPix does A LOT of image manipulation resulting some of the softest
default outputs within the scope of this overview. However, it is quite easily possible
to persuade the application to perform a much less aggressive approach.
For low ISO images it is certainly a good idea to disable the luminance noise reduction
which is active by default. You can choose between two different sharpening
algorithms - "normal sharp" and "pure detail". It is difficult to judge the effects
between them because their sharpening characteristic is quite different at identical
settings - "normal sharp" produces a lot more edge sharpening for instance.
Apart from these (supposedly more sophisticated) sharpening controls you can
also add an additional unsharp masking (USM) on top at the time you export the tuned
images to disk. This is a quite strange approach because if taking advantage
of USM you have to review the resulting effect on your images twice.
"De-mosaic sharp" is another control option but I failed to see a really significant
visual effect regardless of the setting. All-in-all it is possible to achieve
a pretty sharp output without reaching ACR or RawShooter though.
As already hinted in the intro SilkyPix does a pretty good job with colors
straight with the default conversion. Using a fine color controller you can
manipulate the saturation and lightness for 8 colors on the color circle - both
via sliders and also visually within the color circle.
This works pretty well and quite intuitive. There're no controls
for color vibrance so it may take a little longer if you want to go e.g. for more
punchy color via the fine color controller.
The noise reduction within SilkyPix leaves rather mixed feelings. Color noise
(called "false color control") gets handled very well. However, the luminance noise
reduction, and that's the more tricky type of noise, is pretty bad rapidly decreasing
resolution and producing very blotchy looking images when used aggressively. If
you're primarily shooting high ISO images SilkyPix is probably not the application
for you.
Another shiny aspect of SilkyPix is distortion and perspective correction.
Unlike DxO or Bibble it does not rely on lens profiles so it is a manual
process but it is working really well in my opinion and the effort for a
good result is quite minimal. Perspective control is possible via "Digital
Shifting" - during the correction SilkyPix overlays the image with grid
lines to help you in the process.
MOVE YOUR MOUSE POINTER INTO THE IMAGE BELOW TO SEE THE EFFECT OF "DIGITAL SHIFTING"
Manual vignetting and lateral chromatic aberration (CA) controls are also available
and very efficient. Highlight/shadow control ("Dynamic Range Expansion") works
very well whereas the effect of the accompanying fine tuning options seem to rather
marginal.
The processing speed of SilkyPix is fine during the correction phase but
it lasts quite a while to export ("development" in SilkyPix terms) images to disk.
During an (batch-)export the application is blocked.
Conclusion
SilkyPix is a very capable product with numerous image manipulation options.
This is both good and bad because you can achieve very good results but you
may have to put a little more effort into the tuning than with other applications - initially
at least. Once you got used to the concepts of the applications the RAW workflow
goes like a breeze though and you appreciate the completeness of the product.
The weakest aspect is noise reduction so SilkyPix isn't really the best choice for
high ISO images.
|