|
Imaging -
Imaging
|
Understanding the histogram of an image is an essential precondition to
master digital photography both at the time you shoot your image as
well as during post-processing in your imaging application.
There's no big magic behind it - the histogram is a distribution curve
showing the intensity of a tone in relation to its luminosity value.
The left hand side of the histogram shows the dark tonal range usually
referred to as "shadows", the center portion is covered by the
"mid tones" and the right hand side shows the bright tonal range or
"highlights".

The above histogram is based on the complete RGB color space which
means that it's basically an overlay curve of the 3 base color
channels (Red, Green, Blue). Your camera will usually just show you the
RGB representation but in your imaging application you can usually also
display the histogram for the three base colors (see also the
histograms shown later on this page).
Your camera will always deliver images that reside completely within
the luminosity range of the histogram. As a rough rule an average scene
with both very dark as well as very bright portions should cover the
complete range of the histogram. So if you check your histogram on
location and the left or right side of the histogram is empty your
image will be most likely under- over overexposed.
Naturally there may be scenes that simply exceed the dynamic range of
the image sensor. In this case you'll not be able to just touch the
dark or bright end of the histogram curve but you'll hit the limits
with high intensity - the result are blown out highlights if the
histogram is pushed "beyond" the white point (the right-most point of
the histogram) or plain black shadows if the black point (left-most
point) is exceeded.
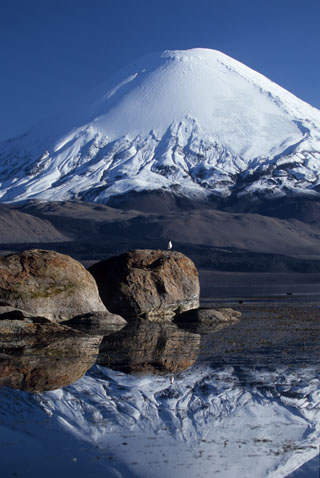
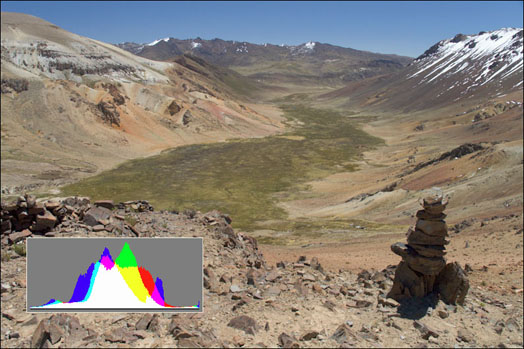
The following sample shows a quite "harmonic" distribution of the
histogram.
Most imaging application offer you to correct your image via
"auto-leveling". The auto-levels function will analyze your histogram
and stretch the dark and bright points of the current image to true
black and true white. Usually it performs the operation for the three
base colors independently and it'll ignore any luminosity levels till a
certain threshold. This works well for many scenes but it is far from
being fail-safe.
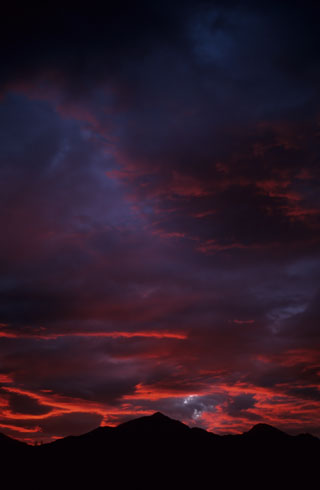
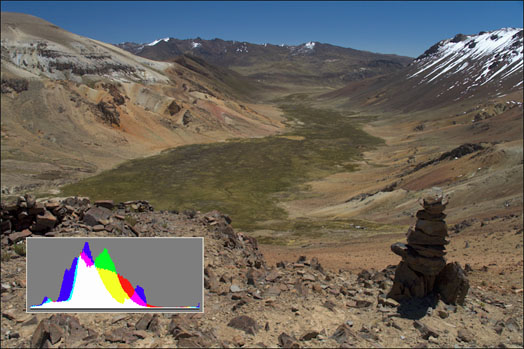
The histogram curve doesn't need to be harmonic or complete. If
there're no highlights in the scene like in the image below the
exposure is just fine. There's no need to tune the
histogram to recover something that doesn't just exist.
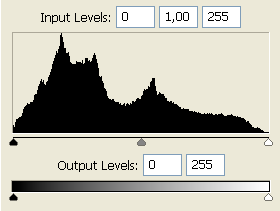
You may notice that there're several sliders below the histogram curve
in the image above (taken from Photoshop here but they should be
available in most
advanced imaging applications). Using the upper row of (three) sliders
you can control the black-, mid- and white points (left
to right).
The 2nd row of sliders control the output level. If you shift the black
point and white pointer sliders the histogram curve will be compressed
to these new values. Usually you will not need to touch these settings
though.
The upper row of sliders is actually pretty useful for basic
corrections. If your image lacks deep black there's some empty space
between the left-most edge of the histogram and the first occurrence of
the histogram curve. By moving the back point towards the curve you can
define a new (true) black point. Same goes for the white point slider
(by
shifting it to the left). Please note that the mid-point will be
automatically kept just in the middle between black- and white point so
if you e.g. shift the black point to the right the mid point will
follow accordingly (in half steps).
Here's a little overview for the procedure:
When moving mid point off its center position to the left or right the
complete tonal
range is affected. e.g. If you want the image to be brighter by
shifting the mid point to
the left the tonal range to the right side (towards the highlights)
will be compressed whereas the
tonal range to the left (towards shadows) will be stretched (and vice
versa if you want your image to be darker). Sounds complicated but it
isn't - just try it.
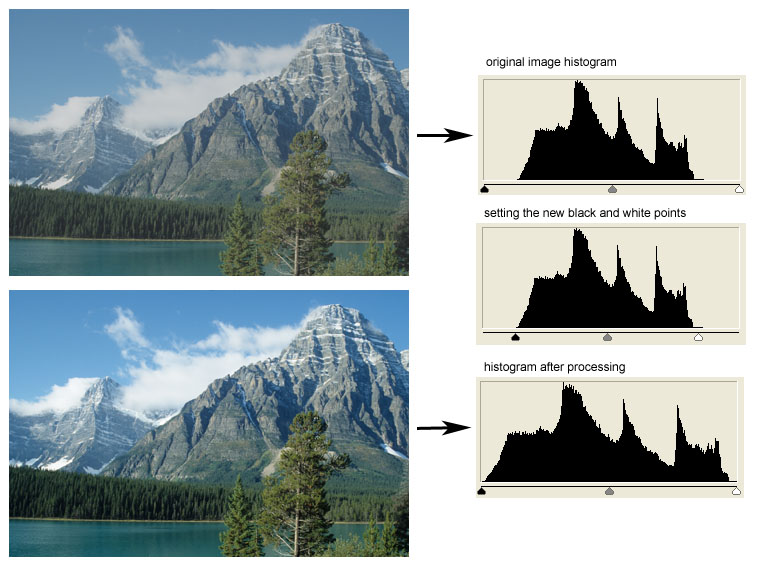
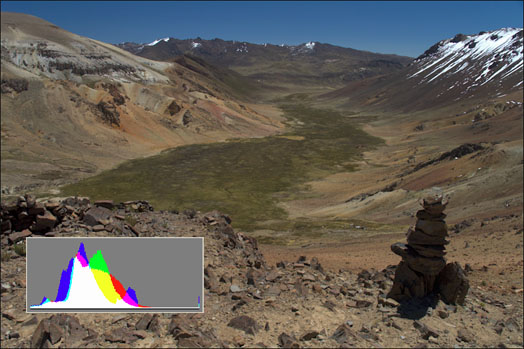
Here's an example for an image correction via the mid point slider:

You may notice that the final histogram in this sample
looks a little odd. As mentioned above the imaging application had to
stretch the tonal range left of the mid point thus resulting in a
reduced density
indicated by the "blanks" in the histogram. The range tot the right of
the mid point has been compressed as indicated by the "peaks". It's
quite obvious that the whole procedure isn't lossless.
Now let's have a look regarding the effect of common image correction
algorithms on the histogram.
Contrast
"Contrast" is the difference between two levels of luminosity.
Modifying contrast can be done on a local basis (for a subset of the
complete luminosity range) e.g. using the curve
tool in an imaging application. However, using a standard contrast tool
with a slider to increase/decrease contrast you do it on a global
basis. "Global" means that contrast is changed around mid-tone gray
(=50% gray).
Now if you increase the global contrast of an image all pixels brighter
than mid tone gray will be brightened further whereas all darker pixels
will be darkened to the same degree - thus increasing the delta
(contrast) of the luminosity within the image.
If you move your mouse pointer into the image below the contrast will
be increased (and vice versa). Now observe the effect on the histogram
that is displayed to the lower left hand side. You should be able to
see that the left and right hand side of the histogram gets "drawn"
towards the edges reflecting the increased "delta" between bright
and dark areas in the luminosity distribution.
|
Move mouse cursor over image to
change the image contrast
 |
Brightness & Exposure
Some users may wonder about the difference between changing brightness
as opposed to exposure compensation.
Exposure compensation in the digital darkroom basically works the same
way like on your camera - your image can take a certain range of
f-stops (the dynamic range). If you over- oder under expose your image
you'll shift the image luminosity across unrecoverable limits. The
luminosity curve of the histogram will exceed the edges of the
brightness range in this case - a "clipping" situation thus severe loss
of
information. Therefore you should expose your image with a histogram
that is as intact as possible = the curve remains within the limits of
the luminosity range.
On location (with your camera) it is often not possible to get an image
with a perfect histogram simply because the dynamic range of the scene
exceeds the capabilities of the camera - in this case you should decide
for a correct exposure of your main subject.
Using an imaging application you can simulate the exposure
characteristic of your camera thus applying exposure compensation "post
mortem" - with similar consequences as mentioned above.
Changing image brightness in an imaging application is similar but not
identical to exposure compensation. If you increase/decrease brightness
you do so WITHIN the dynamic range. As a consequence you will NOT run
into a clipping situation (within limits).
You may notice that the difference between applied exposure
compensation and increased brightness for the chosen image is marginal
in this sample.
The different behavior gets more obvious when pushing the image "over
the edge" (by over-exposing or over-brightening) but this is really
dependent on the image.
Brightness
|
|
Move mouse cursor over the buttons below
the image to
change image brightness
|
|
|
|
Exposure
| Move
mouse cursor over the buttons below the image to
change image exposure
|
|
|
|
|
|